2019 Level up Your Business Web App with SVG Animation
- Speaker Benjamin Felda
- Conference THAT Conference 2019
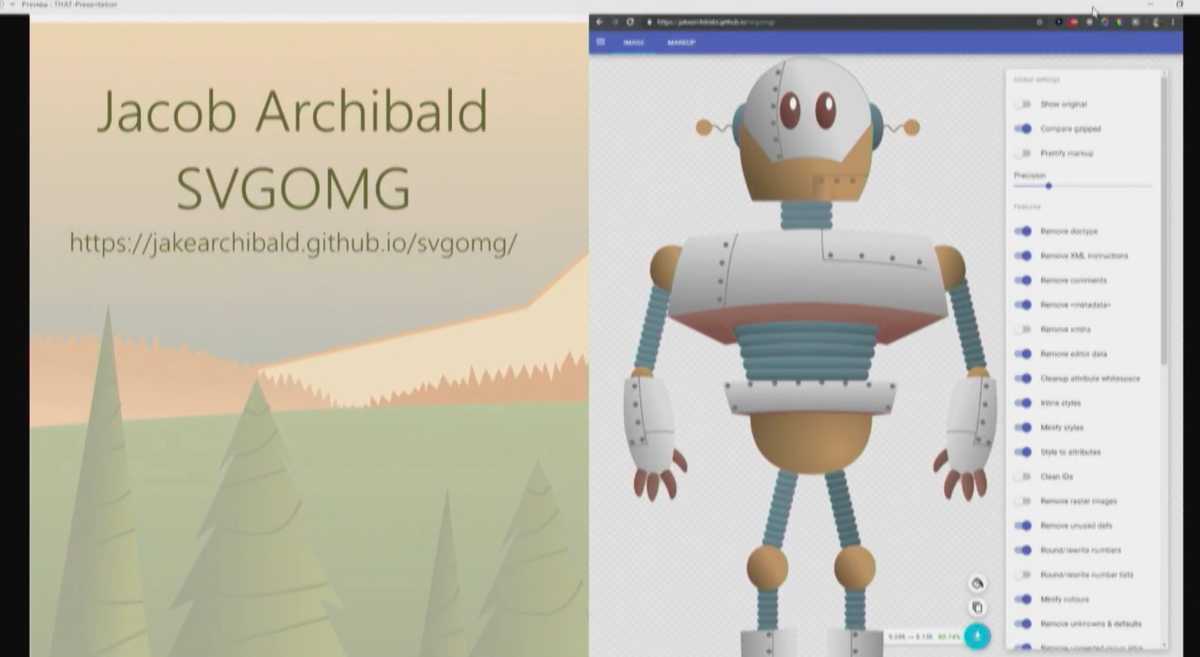
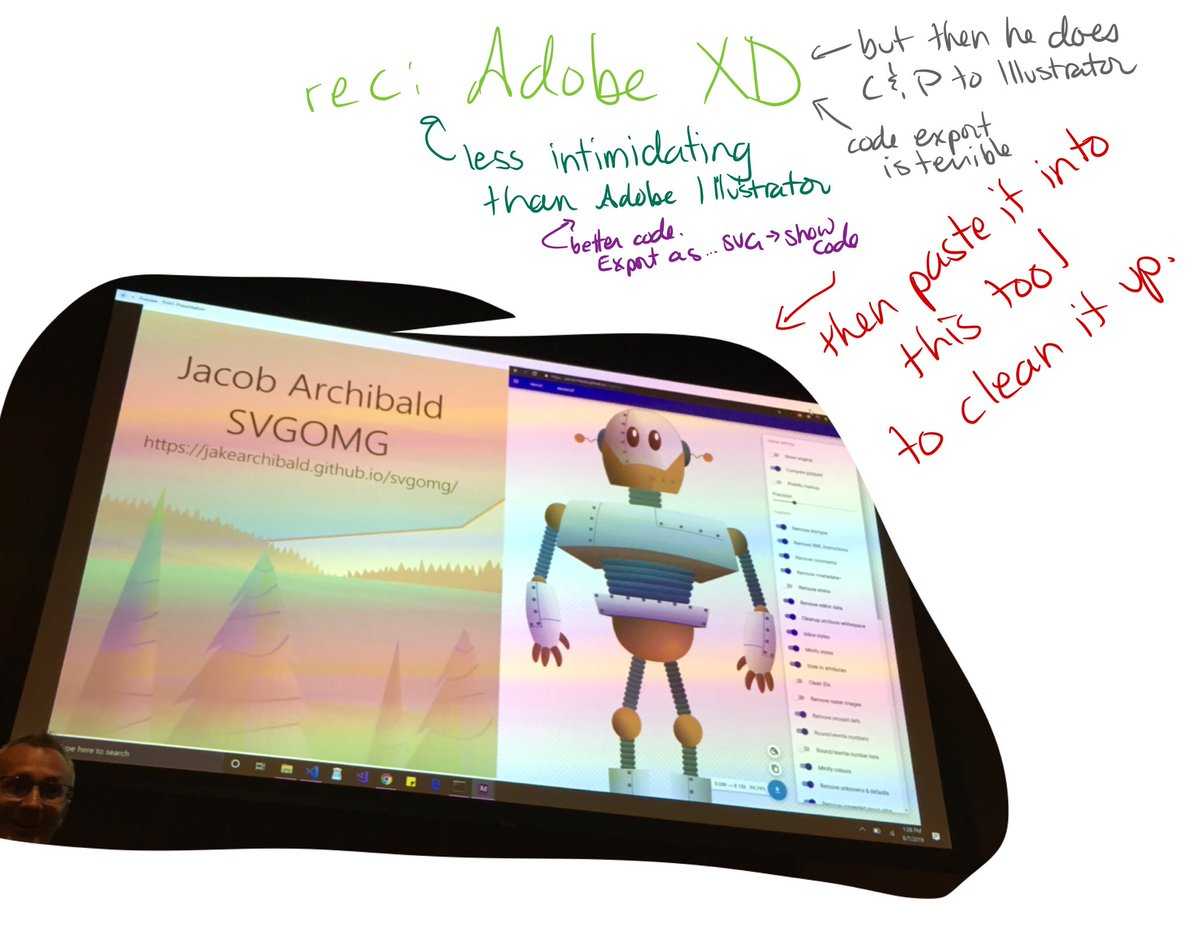
https://jakearchibald.github.io/svgomg/
https://github.com/bfelda/svg-interaction
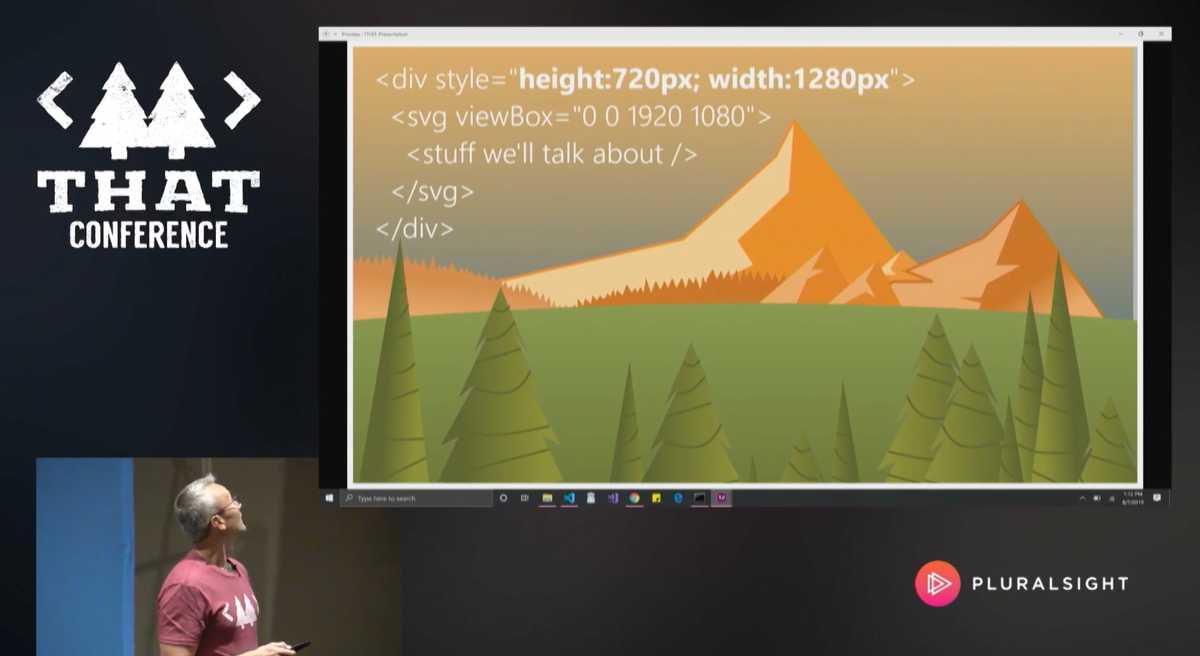
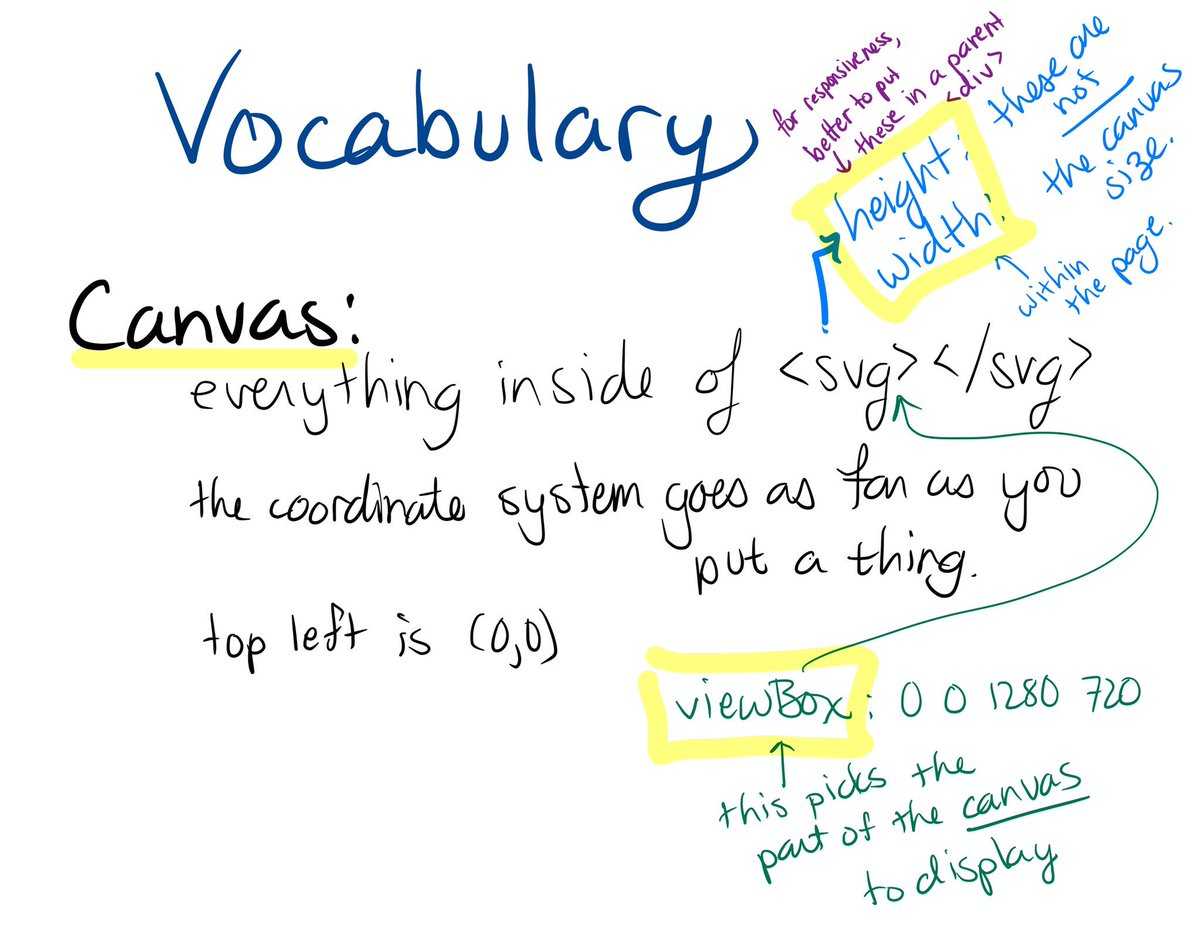
The height and width properties of an SVG element (or better, its parent div) determine its size on the page. Its ‘viewBox’ property determines the portion of the canvas that shows.
The canvas is as big as it needs to be to hold everything.
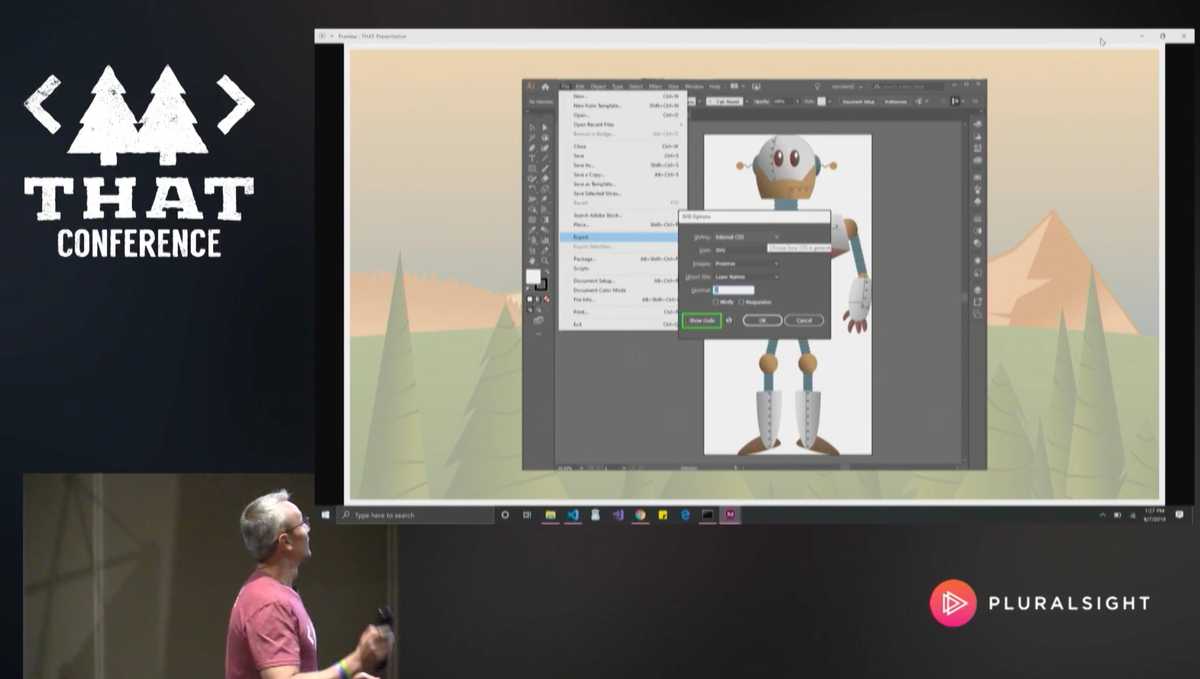
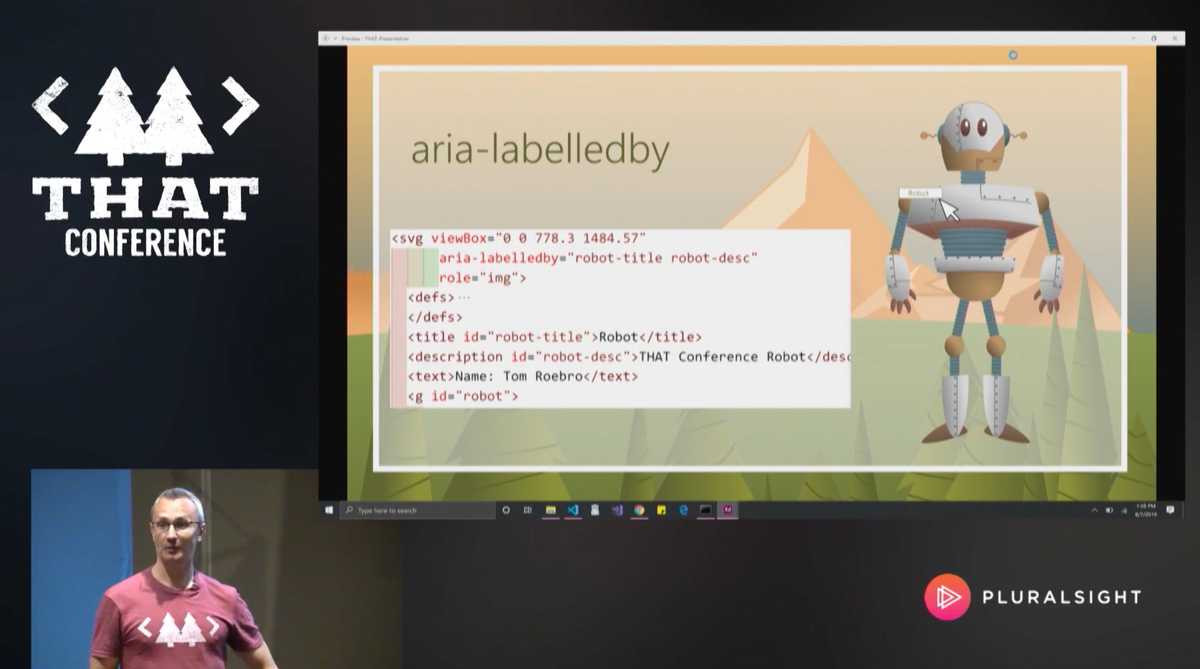
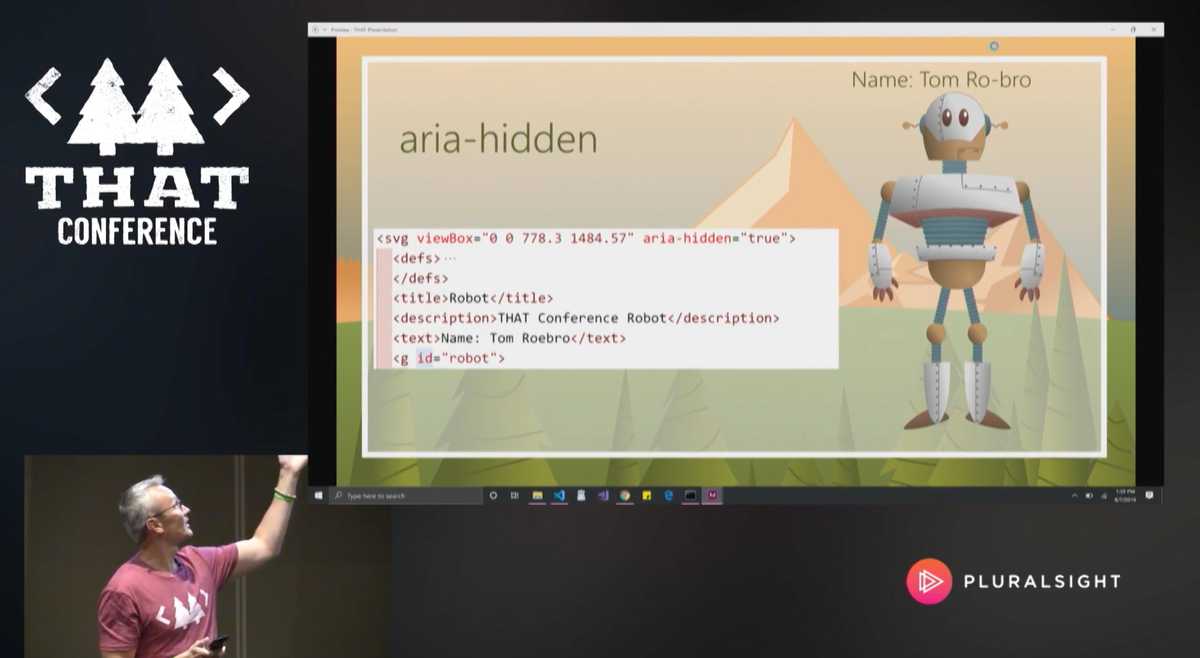
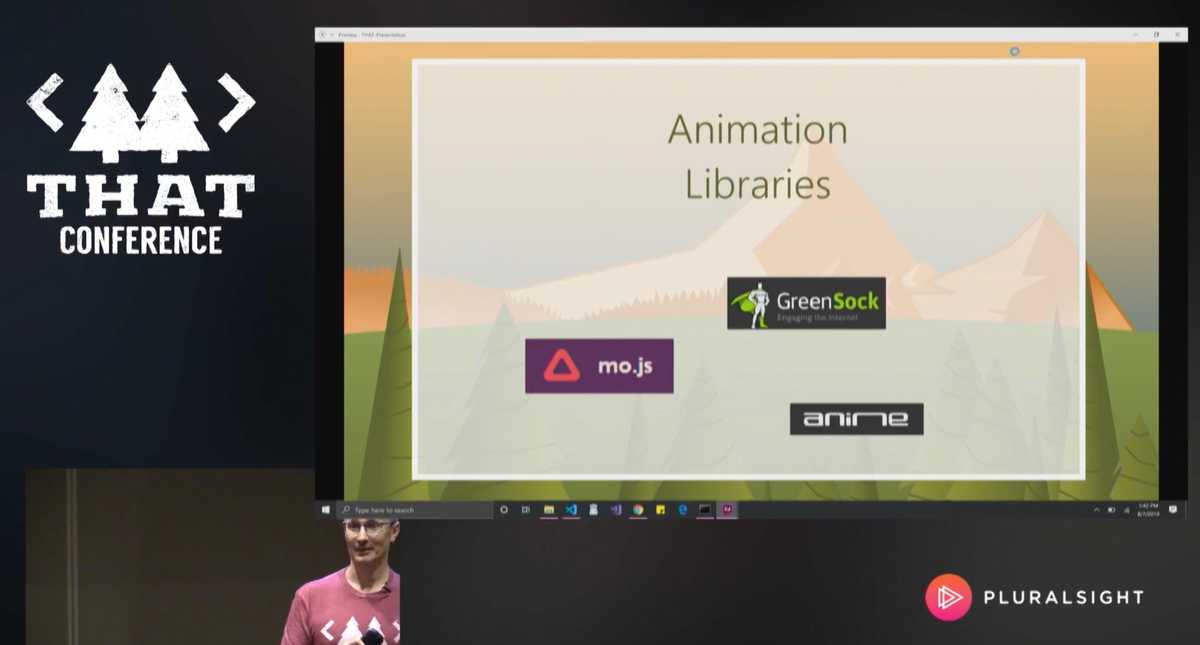
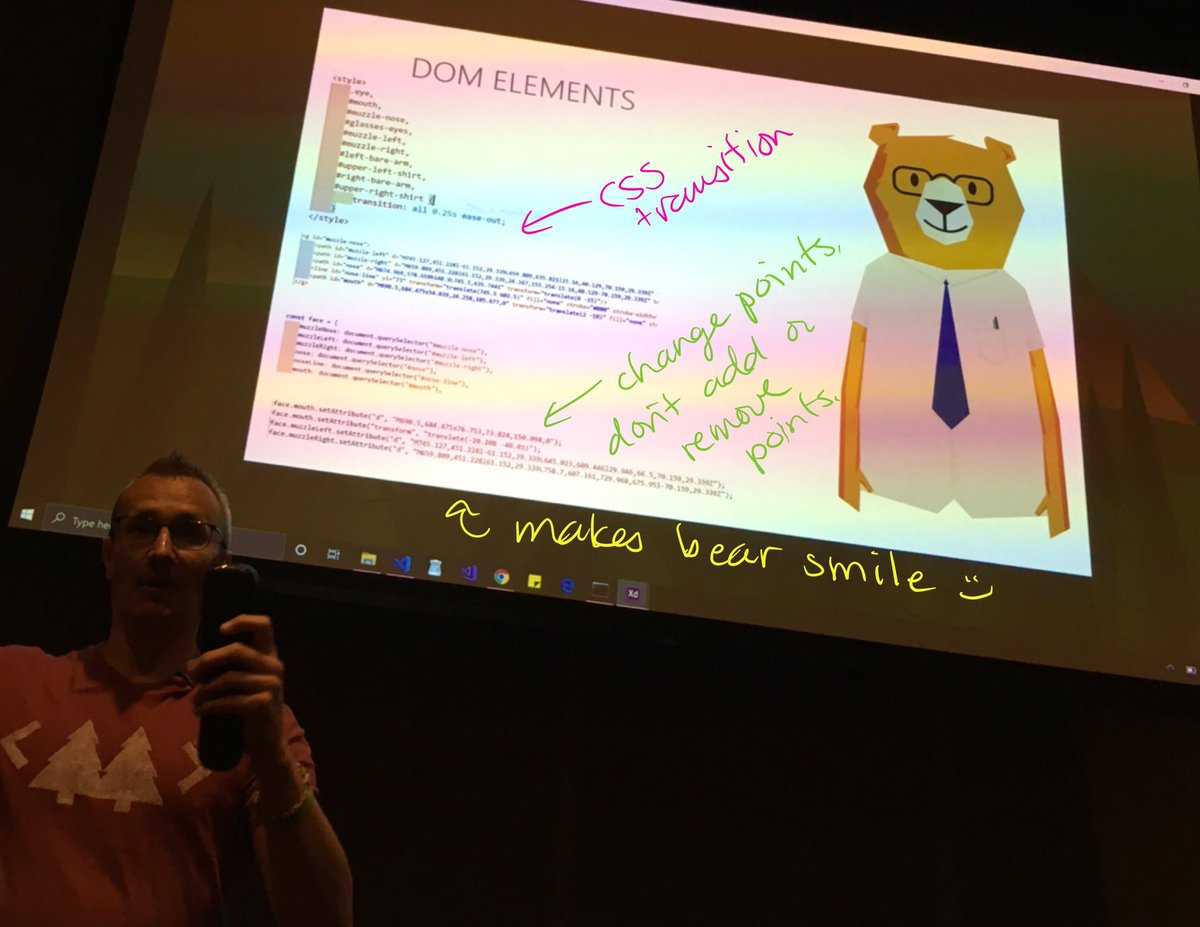
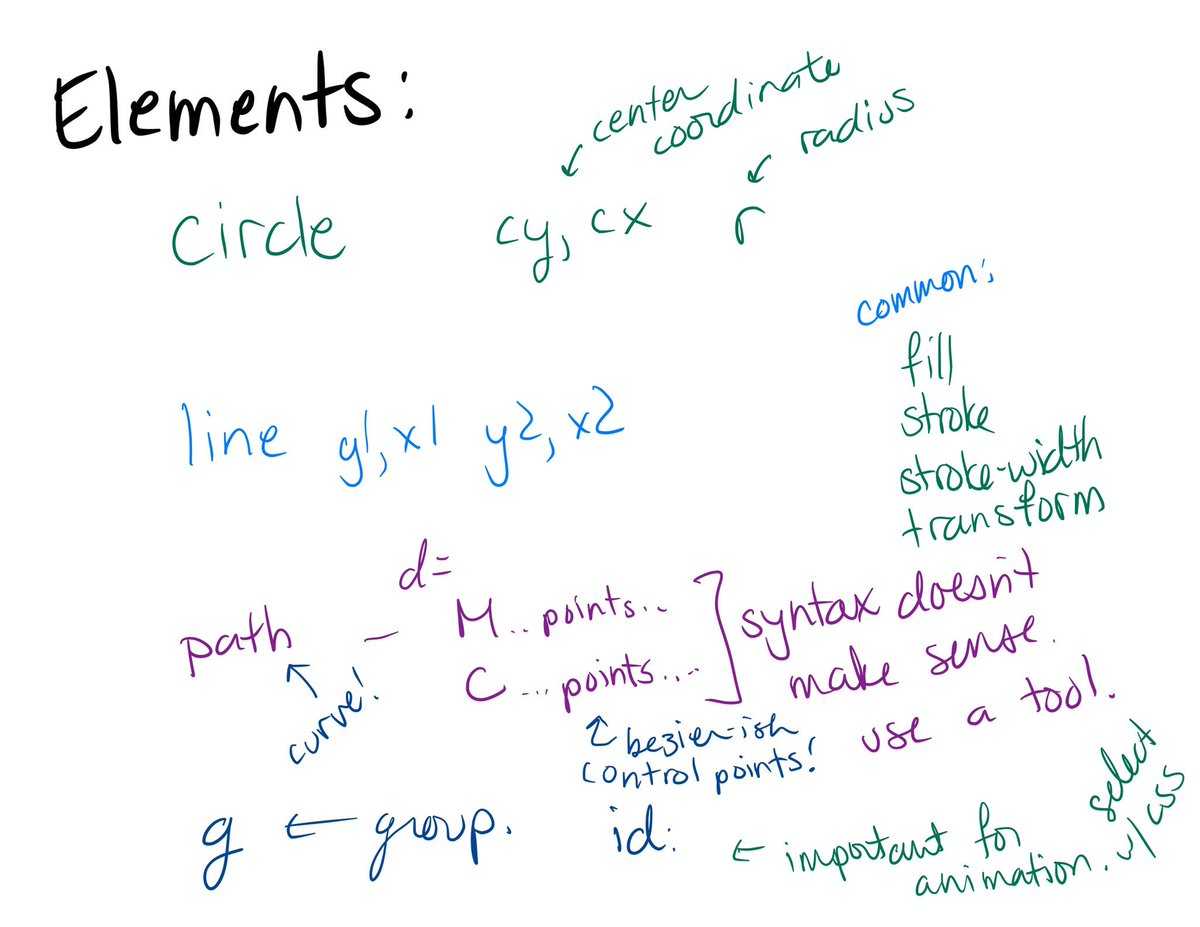
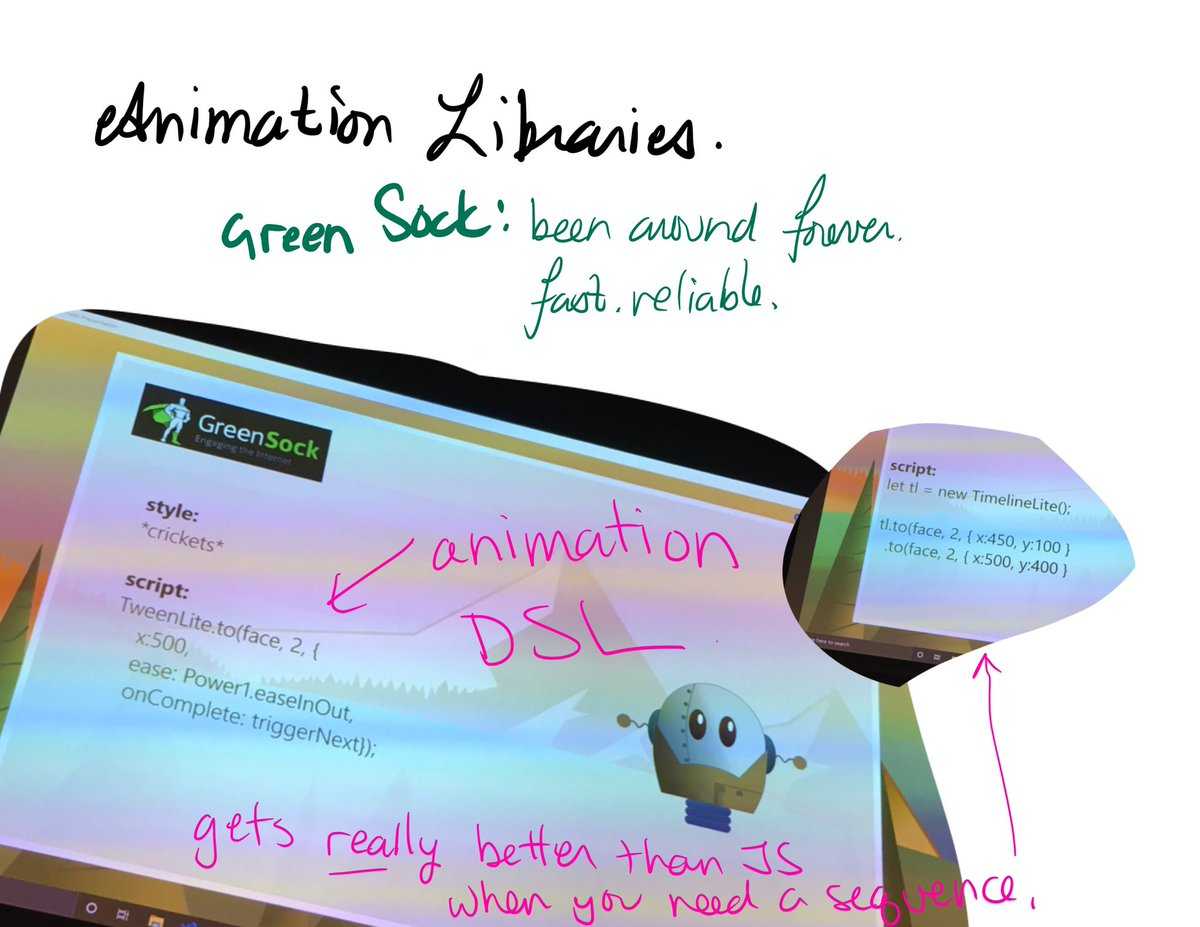
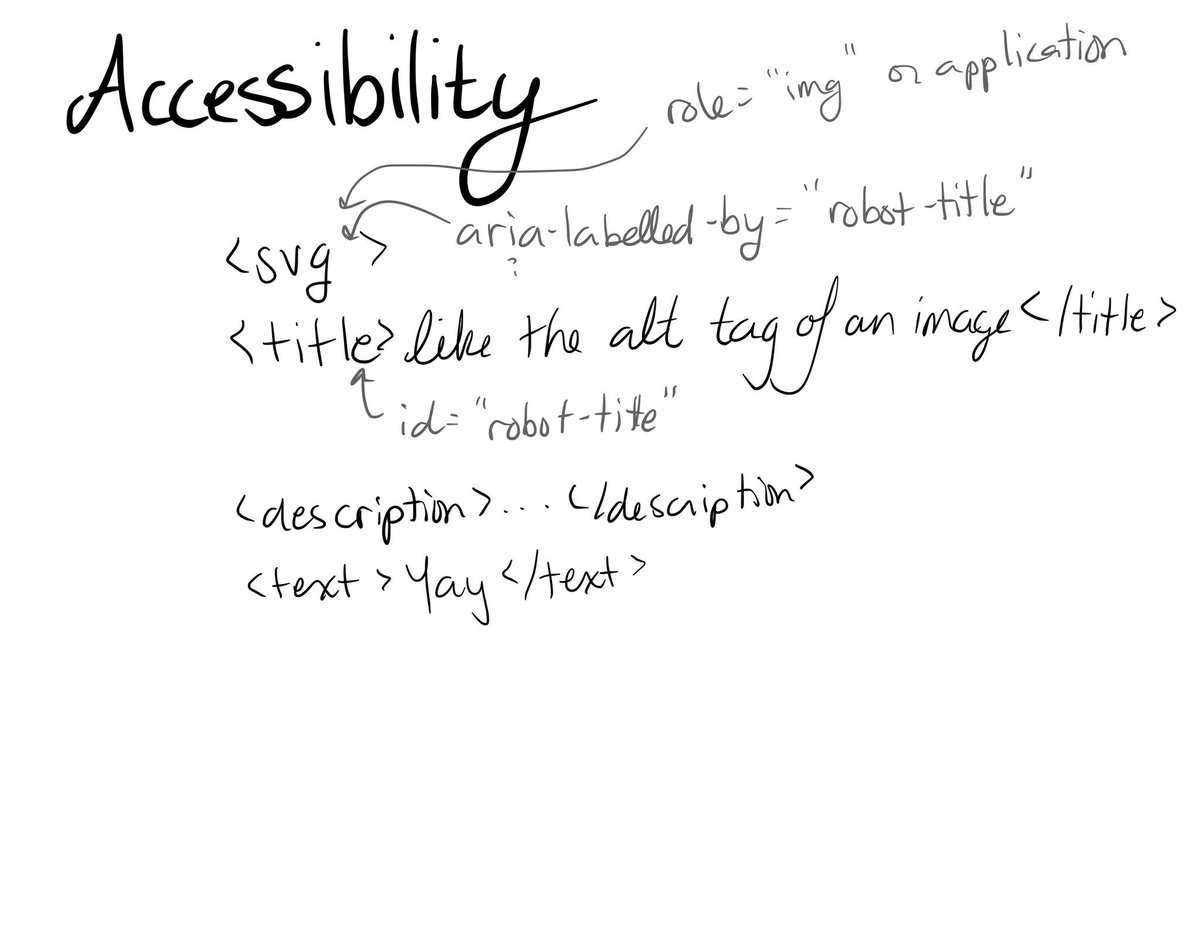
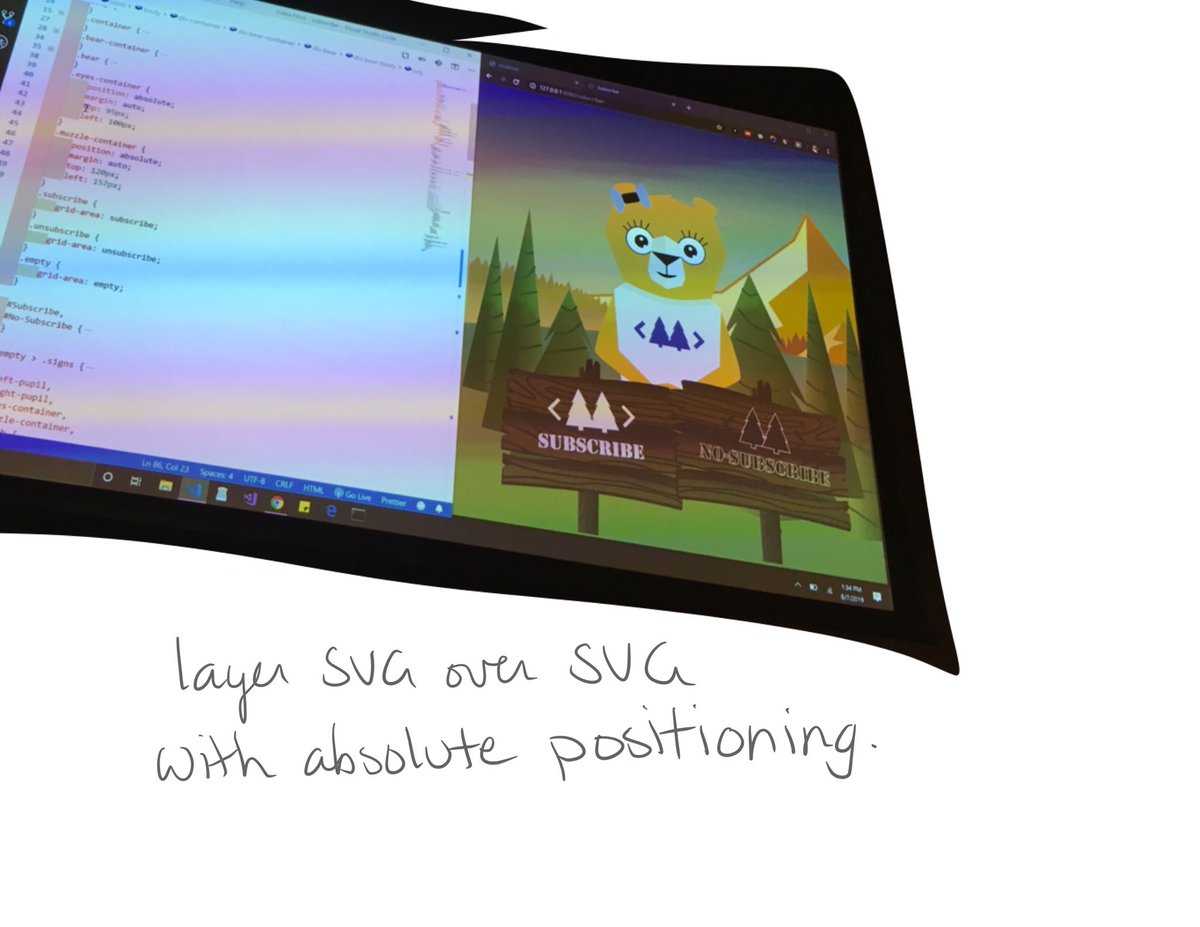
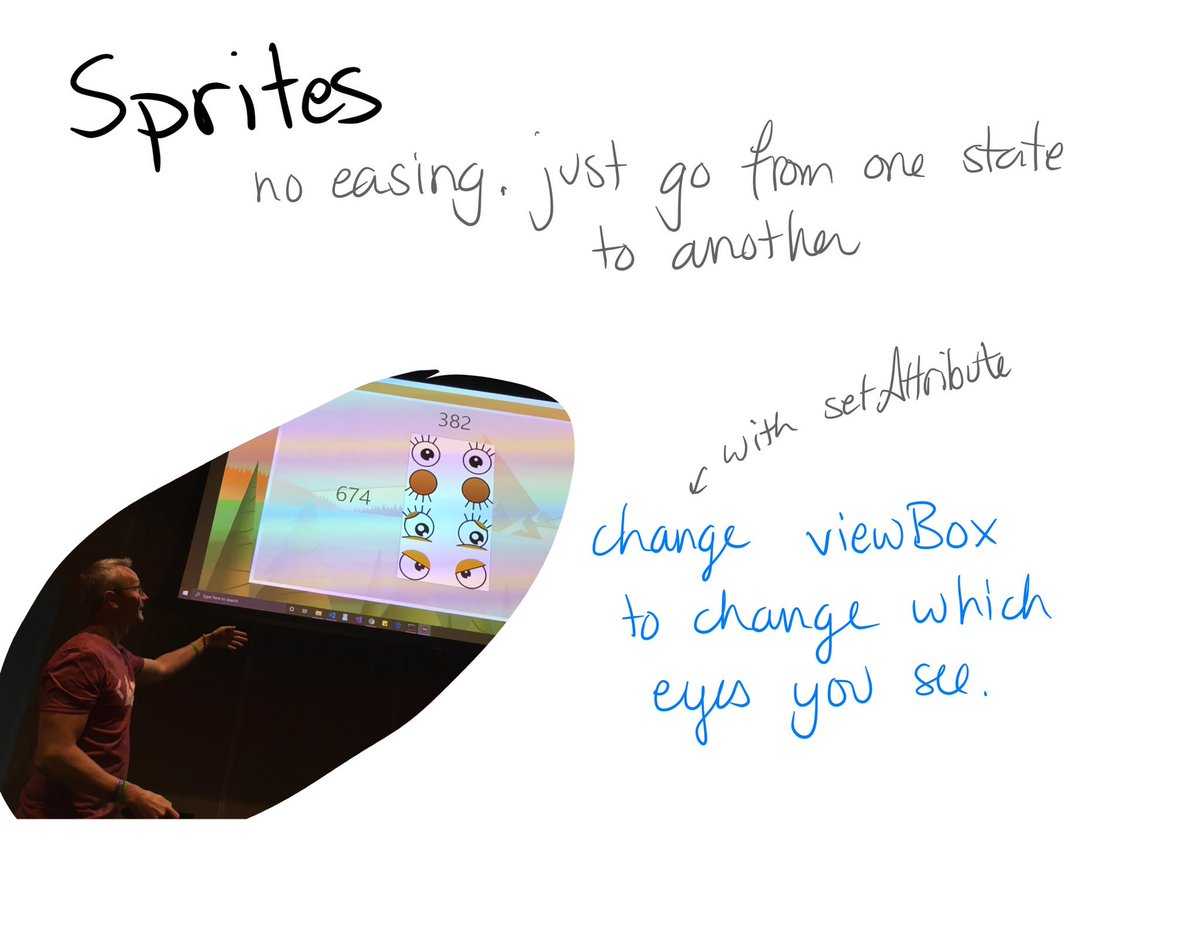
thank you for coming, guys. I got to aim that way, there we go. All right, I'm going to come back to this one because first I want to introduce it. So, this is the Web Animation for SVG. How many of you guys here have worked with SVG? Wow, a lot of people. Excellent, good, good, good. How many of you guys have worked with SVG more than just copying SVG and pasting it as an icon? Actually gone in, manipulated the SVG and played with it? Great, great. It's a fun tool to play with, SVG is a lot of fun. This talk is going to be a lot of fun. So, I hope you enjoy it. I made a lot of little characters for us to play with throughout this one. This presentation is hosted at this URL, one of the bit.ly weird ones. My name is Ben Felda. I'm a front-end developer, designer, play a lot with SVG, play a lot with graphics, a lot of animation stuff. I usually get brought in when there's just some animation that wants to get implemented in the UI to make it fun, fun for the users, and also just because animation makes things flow better for the user so they understand it a lot easier. So, that's where I usually come into play. I also do a lot of just whatever comes in front end. @Ben_felda is my handle. And on to the next one. My company, I'm with 53 Prime. It's a company, just me and a friend of mine. We have a shop out of the Milwaukee area. We do lots of, he's the architect, I'm the UI. Ying to the yang, we work really well together. We take on lots of projects from simple blog sites to video editing sites to healthcare industry applications. So, lots of variation in what we do. But it's just me and him working together on these remotely. It's a lot of fun. So, back to the sponsors. Definitely want to shout out to the sponsors of this THAT Conference. Definitely go visit their booths, I'm sure you already have. There's lots of cool swag out there and lots of fun things to do out there too. I like how they got some of the kid stuff going on out there at the actual sponsor booths, which is really awesome. Also, if you get a chance, be sure to thank the guys in the purple shirts out there, the guys running this conference. So, I'm part of a committee that helps with a conference, the Cream City Code conference in Milwaukee. And it is a ton of work. And it's all volunteer time doing these things. So, definitely when you get a chance, thank them because it's, I'm sure that the thank you won't go unnoticed. They'll appreciate it. All right. All right, so, getting started with SVG. Now, a lot of people here, a lot of hands went up with SVG, but just, I want to recap a little bit as to why we want to use SVG more often than not. First of all, with SVG you have a lot fewer http requests. You have actually 0. If you embed the SVG in your DOM, it comes with the payload. You don't need to have any HTTP requests for images, logos, anything like that, it's right there. It's very small, it doesn't take up a lot, it doesn't muddy up your DOM too much, and your IDE, you can always just hit the little minus to make it smaller, so it's hidden a little bit. But no HTTP calls. So, it's just your page loads much, much quicker when you're using SVG. So that's the first, real, really important reason to have it. Second off is it's all just fun math, you know? Math is fun and SVGs are just math, you know? It's easy to work with. For example, here we have an SVG and we got this grid going across and down. And when it comes to SVG, I get a lot more into definitions in a little bit, but it's kind of like a game of Battleship where you have 0, 0 in the upper left, and whoops, you've got 0, 0 in the upper left and you have whatever number in your lower right. And it's just points along the way. And these points along the way can just be 960 over, 200 down, have a dot right there. And I can have a line going to 960, well, I got the same number there. But a different number going down. 800 over, 400 down. There's another line going to that one. So it's all just math, it's all points along the grid and putting lines together, drawing shapes, filling the shapes in, adding a stroke on lines. It's all just math. And the nice part about it all being just math is when you zoom in you can make it any size and that's how SVG is scalable. Scalable vector graphics, it's scalable. You can go up to any size, down to any size. You're not bringing in the full image data. You're letting the browser draw it based on what you're telling it to draw. So, that's why SVG is so much smaller. The browser's rendering it, you're just sending the instructions along for the way. And you have a lot smaller file size. So, this little robot in the corner here, that little guy right there, if he was a PNG he's 147 KB. As a JPG, I put it at around number 7 for quality, 121 KB. As an SVG, 8 KB, hardly anything. Very, very small. Again, it's just instructions, okay? So you get a better quality image and a lot smaller payload, and really at that size just embed it in the DOM. You don't need to even make the call for it. But if you do make the call for it, it's going to be a very quick one. Oh, and by the way, ask questions throughout this presentation, I'm totally cool with that. I'm okay with just hands up, I'll call on ya. If I see it going down the wrong way I'll wrap it up and mention it again at the end, but I'm happy to answer any questions throughout. Another positive thing of SVG is it's interactive. If you have a picture that's just a JPG or a PNG and you have some text in it, you can't select that text. You can't do anything with that text. The screen readers can't get to that text, nothing can get there. It's not accessible at all. So, with SVG text, actual text elements, which are part of SVG, you can have text right in there that you can make colorful, you can do lots of fun things with the text, you can select it, you can highlight the text, you can copy it so your users can really use the text that's in your images. Much more useful, screen readers can read it, the browser can read it, the browser, it can crawl it and read it. Google can crawl it and see these images and the text in your image. So, a lot more power there. And interactivity, again, we also have links. You can have links. So in your one big SVG, like, here's an SVG image with grass, trees, robot, mountains, I could have that robot linked to another web page about robots, or I could have it do a hashtag link down further on the page. So you can make it really, really interactive. So I can click on the tree, click on the mountains, whatever I want to click on, you can just add links to your SVG elements. All right, the SVG canvas. So we're going to get into some actual definitions because SVG gets kind of confusing. What is the view box, what's the canvas? What are all these different numbers that you're playing with? And SVG kind of gets hard to play with because things go really wrong if you play with the numbers wrong. So, first off the SVG canvas is pretty much everything that you have in an SVG element. SVG tag starts it, SVG tag ends it. Everything inside of that is the canvas. And again, the canvas has a coordinate system. In this case, the coordinate system starts at 0, 0 in the upper left and goes all the way to 1920, 1920 across on the X axis, 1080 down on the Y axis. Sorry. - Why? - Why? Why does it go 1080? - Yeah. - It can go to whatever your furthest element is. So let's say I add a circle to this SVG and I place the circle at 2, 000 and 2, 000 down. Now my canvas is 0, 0 to 2, 000, 2, 000. Even though it's just open space in those other areas, my canvas now goes that far. You can think of it as like an Excel document that has, you have your first cell on the upper left. And it can go forever and ever and ever until memory issues and some other things happen, but you can go far down in the other corner. It goes as far as you have another thing. So if you fill another cell, that is now how big your document is. Same thing with SVG. So in this case we have the top of the mountain is 900 over, 180 down, and that's where we place that point. 550 over, 600 down. So it's all just points on this grid, okay? That's important to remember throughout this talk because we'll come back to that quite a bit. Other attributes are height and width. You've seen SVG elements have height and width. Well, what does that actually mean? Why would I give it different height and width? Well in this case, this SVG element happens to have the same height and width as it does have canvas size. So it is 1920 across, 1080 down. And that is the pixel size, okay. So it has nothing to do with the canvas grid. It is actually the pixel size of this element on a screen. So if my screen is 1920x1080 it would take up the whole screen. So, what if I change the height and the width to 720x1280? So that's 720 high, 1280 width. The entire thing would shrink up. So now it is actually a smaller SVG element. The height and width is smaller. But we still have point 0, 0 in one corner, we still have point 1920 and 1080 in the other corner. So the coordinate system stays the same, you just change the size of the actual SVG element. So in this case, here is actual SVG code. We have the height at 720, the width at 1280, the viewBox we'll get to in a little bit. But why put the height and width in the actual SVG element? You can take that height and width and put it in a parent element. And this is where you now have the height and width in the parent. And the parent could be using Flexbox, it could be using CSS Grid, could be using anything to size the SVG element, and it will now change responsively to that parent. And of course when it changes responsively it doesn't get pixelated, it doesn't change, it doesn't get all weird like some images do, like most images do. So that's how you make a nice, responsive SVG element. Take the height and width out of the actual SVG element, put it in the parent. Now that one part that you see the viewBox, that's a confusing part. That part took a little bit in my brain to what the heck is this viewBox thing, but it's one of the most powerful parts. So the viewBox, in this case, 0, 0 to 1920, 1080. Now, 0, 0 to 1920, 1080, these are the actual SVG grids. So the viewBox, we're viewing the whole thing. So you remember the canvas was the same dimension. So basically the viewBox is saying you're viewing the whole thing. The viewBox is what portion of this are we seeing. So, we're starting at 0, 0. So we're starting in one corner, we're ending in another corner. What if we change the viewBox to 1280x720? Just like we changed the height and the width. When we change the height and the width, the whole thing got smaller. But when we change the viewBox, we're not just viewing part of it. So now we can actually pick and choose what parts of this SVG image do we want to show our users. And now we're just viewing this one little corner. Not a very pretty corner though. What if I want to change it? So, I started at 0, 0 before. Now let's change it to 200, 100. So we're going to change it to going in 200, down 100. That's our starting point. And we're going 1280x720 down. So now we're viewing the SVG in this little portion here. So that is what a viewBox is. A viewBox is what portion of the SVG canvas are we viewing. And you can have that animate, do whatever you want with. Yes. - So, if you had text on there if you change your viewBox to not have the text visible, will that change what like a crawler would see as well? Or a screen reader would see? - The question is, what if the text is outside of the viewBox? I think the answer is no, it won't change it. The SVG is still there, crawlers will still see it, the viewBox is display only. I'm not 1, 000% on it. - Yeah, that's what I figured. (Inaudible) Okay, that's two for that one. So that is the vote. It will do that, you will be able to still crawl it, see it, everything. You won't be able to select it because it won't be viewable, but yes. Thank you. All right, any other questions on those things? So those are kind of important ones. Lots of numbers there, but we have the SVG canvas, which is the full grid. We have the SVG height and width, which is almost the size relative to its parent. And we have the viewBox, the dimensions that we're viewing now. All right, before I get further let me just talk about some SVG elements. Now we've talked about the size, the whole SVG itself, the elements themselves we have. So, we'll start off just talking quickly about circle. So we'll glance over this. You guys have probably seen this before, but we're going to be talking more about it so I want to review it now. So here we have an SVG circle. Cx and cy is really on that grid system. Where on x and y are we starting? Where's the middle of the circle? Radius is just the radius. What on the CSS grid is our radius? And then, of course, every SVG element that has, if it has a closed path has, you can have a stroke, you can have a fill, color, whatever you want. Stroke width there. Next, we have some lines. So, I made some eyes here with lines. Lines are really simple. Again, same stuff here. You have xy, x1 and y1. Where is our first line's first point? And then x2, y2, where's our first line's second point? And a line is then drawn between them. Pretty simple. And then we have a path. So paths get a little confusing. Paths are things that you really don't have to learn. This is where you let the editor that you're using to make your SVG, like Illustrator or Adobe XD is a pretty cool one to start out with, and I'll show you some of that in a little bit. But just to get an idea as to what paths do, there's that d letter. The path has a d, which is really what the actual path dimensions are. Is that what d stands for? I don't even know what the d stands for. I say it's the d. So, here in this case the first ones are 30, 70, meaning we're going over 30, down 70 on this face. And that's where that first little dot is. So that's our first, that's where this path is going to start. The next one follows, well, in this case we'll use controls. So, the letter C stands for controls. So our first control is 40 in, 80 down. Our second control is 60 in, 80 down. And our last point is 70 over, 70 down. So we're using controls now, and how many of you guys have ever done that with a path tool where you have controls and you kind of drag the control and make the smiley face or make whatever shape you want? Yeah, it's a pretty common practice in a lot of editors. You can change it. And, of course, you can make him frown, which is pretty sad. But yeah, you can move those controls around however you want and make your shape however you want. But we'll make him happy again. Now also, I can take this entire thing and put it in a group. A g tag is a group tag. It doesn't change the SVG at all, but it makes it easier to access. I could say I want the path, and I could give the path an ID of smile and I could change the smile directly. Or if I want to move the whole face over in an animation, I want to have it go from one side of the page to the other, I don't want to have to reference every single thing. I could just reference the smiley ID, have the whole thing move at once, that makes it much easier. Any questions on the elements? I see a question being brewed. - Why is there one M and one C, but the last one is a point? - I know, I don't get it either. Because you're only going to have two control points. - Why? - I don't know. We'll write Mozilla and find out. (Woman laughing) So the question is, why is the front M being one point, the last one, even though they're comma separated, how do you know the middle two are controls? And that is where reading the docs came in. But that's also where I don't really care because those are just cool things to know just so it's a little bit disillusioned. But I never actually went in and manipulated those directly. But yeah. All right, so getting into some SVG animation now, now that we know those basics, let's animate this stuff. And we'll start out using some JavaScript and CSS. And yes, I will be going back here, showing you some code, showing you a mess of demos. The slides are coming to a close. But first off, SVG, again, is just a DOM element. That's another reason, one of my original reasons to use SVG, it is just DOM elements. So here you see we have a group with an ID of bear, and here's the bear dad. He's got an ID, a group with a face, face background, glasses, the muzzle on the nose there. You can see the mouth has the letter, the d thing there. You've got shirts. I split up the shirt and the arms a little bit. And I split them up so I can animate them. So you'll want to do that when you're making an SVG element, SVG that you want to animate. You want to split it up into pieces that you can animate. So you do have to kind of have your thoughts ahead of time as to what you're going to do. So on this case, there is the muzzle and a nose, which is the SVG right below the glasses area, the muzzle, nose, and mouth. And in JavaScript, of course, you 're going to want to make these into a constant. You don't want to sit there referencing them over and over in your functions, so you make a nice constant of all these pieces. So in this case I have face, mouth, nose. And then you see below that I have, I'm just setting the attribute. So like face.mouth .setAttribute. There's that d attribute. And I'm just changing it to something else. And what do I change it to? I make him smile, that's it. So, all this, these four lines right down here by adding them and through JavaScript just setting the attributes, I'm making him smile. So, I'm changing the muzzle, I'm changing the path of the muzzle, the left muzzle and the right muzzle. There's a little different shade to him, so there's two of them there. And that's it. I'm also, in CSS, now you see it happens kind of smoothly. It usually wouldn't happen that smooth. So you want to animate it with CSS. So I'm using standard CSS transitions there. So notice I'm grabbing the eye, the mouth, the muzzle, all the things, and I'm saying all of them, whatever you have, ease out over a quarter second, and that's what makes this smile nice and smooth just using regular CSS. Now, there are catches to this. When I'm changing the d attribute, you don't want to change it by adding more points. You want to change it little, you want to keep the same number of points. So like the smile had three points. It had a point on the left and right, had a point in the middle, And I kind of changed how they were looking. I changed those existing points. If I were to add another point along the way, then the animation would look really janky because the browser didn't know what to do with it. But the browser does know to change the path and how to animate it properly. All right, first demo. All right, so here's the bear, here's the code. You can see all the same stuff we just saw. So in this demo, how many of you guys have seen this demo? This is a cool demo, I like this one. So, he starts moving his eyes when I type. So I'll type in my email address. I have some validation in here. So when I type in an at symbol and a letter he smiles because he knows I'm really typing an email address. And when I tabbed onto Password, he covers his eyes because we don't want him to see my password. But if I do need to peek at my password he could peek at my password. So, it's just a cool, little, fun interactive, something to play with. And it's making it fun. If you can make your forms fun for your user, this may be a little overkill, but you can do little things to make it a little more fun and enjoyable for them. And even something that, hey, share it with someone, this is cool, and your brand gets out there a little bit more. All right, so in this one, here you can see I have all the SVG stuff here. I have my viewBox. I have the muzzle nose area here with all that stuff. So, I have another file altogether with just the selectors. So I made a separate file with just all the selectors so I can go, face.mouth .setAttribute, face.mouth .movethis, all that stuff. And I have a separate animation file. So the animation file, you can see that's all I'm doing here. I'm saying for covering the eyes, body, upper left shirt, setAttribute, transform, translate. It's just transforming and translating it. So, how do I get all this stuff? How do I know where to transform it to? How do I know what to set these to? I don't know those numbers specifically. I don't know where exactly these are going to go. So, one of the easiest ways of doing this that I've always come across is in this case for this demo I've done all of these with Adobe XD. How many of you guys have used Adobe XD? How many of you guys used Adobe XD for SVG animation? I know, crazy. This entire presentation is done in Adobe XD. So every slide that translates and moves around, that's all with Adobe XD. And everything that you make in Adobe XD, circles, shapes, paths, they're all SVG. So I can just click on something in Adobe XD, like this guy right here, and I can just hit Ctrl+copy and I just copied all the SVG code. And I can go to an IDE, paste it, and there's the SVG right there. So I can copy him and I can copy him, and I can say okay, what is the mouth coordinates before he smiled? What are the mouth coordinates after he smiled? And that's it. So I use, Adobe SG is good, there are some catches. I would say if you've never really used an editor like Illustrator, Illustrator is kind of like really powerful, really great. But if you've never done that, you don't really want to learn everything. You open Illustrator and it's like what the heck is this, and you close it, Adobe XD is really a good starting point. You can make some basic shapes. Everything I've done in here, and you'll see a lot more, we're just done with this one editor. So you can do some cool stuff. So in this case, here is the bear when it was just at rest, and here's that letter d, and here's where it's transformed. It was at .2, -18 to start. And when it was smiling, the letter d changed and the translate changed a little bit. And you can even see, if I were to go in and let's find where smile is, I thought I had it. So if I copy this, face.mouth .setAttribute and just right in the browser, let me get rid of this so he doesn't smile anymore. There we go. So even if I just go and paste this in, he smiles. Now he smiled quite janky there. Why did he smile that way? Because right below that you see there is a transform. So, smiling and moving and changing paths, it didn't know to change where it started from. So at the same time, I'm also moving it. So the transform moves it back into a proper location. And that's it. It's pretty cool and pretty easy to get started animating this stuff. All right. Whoops, didn't want you. And let me find where I was. So, yeah, again here is Adobe XD. And I've got to, it's done that a couple times. All right, we were here at demo time. All right. So, optimization. Now, with SVG you don't, copying it from your IDE, from like Illustrator or Adobe XD, you can copy it and paste it and that's all fine, but you kind of want to optimize a little bit. They send, Illustrator sends a lot a garbage with it. They send little XML things of this was made with Illustrator. And also the decimal points are way out there. They have, you know it's yeah. So what you want to do is optimize it a bit. So, here is a picture in Illustrator. And in Illustrator I can just click on File, Export, and Export As, and when you click on Export As you can change a couple things. But you can hit Show Code. So you don't actually have to save the file because when you're doing this you're going to have a ton of little SVG files. You can just click on Show Code and that brings up Notepad with the SVG right there. So you can copy, paste it out. So that's how you can get your SVG code out of Illustrator. Adobe XD, by the way, is way messier. The code that comes out of it is horrible. So I usually will make it in Adobe XD, I'll copy it, and then paste it into Illustrator. And then I'll export it from Illustrator. Illustrator just straight up cleans it much better. But it still is a little bit dirty. So, the next thing I do is I take the code out of Illustrator and I go to a website called SVGOMG made by Jacob Archibald. He made this website really, really great for optimizing SVG. You just paste the code into the editor and then you have all these options, you can change the precision if it's not really like, it doesn't have to be perfect, you can change the precision to reduce the file size, you can have it round and rewrite the numbers, which is, of course, the one you want to do. Minify the colors. Something you don't want to do, clean IDs. You can see the second one that's turned off there, it says Clean IDs. Your IDs are what you need if you're going to animate. You need the IDs to reference them. You want to keep your IDs there. But you see in this case it reduced it to not that much smaller, but down to 8.15K, which is pretty good for this picture. This picture's pretty complicated. Did I do that? Okay. I keep flipping my arm and I got it on the wrong, next time. Other side, okay. All right, any questions on optimization? And that's, really there's a lot of other optimizers out there. I'm just going to show that one because that's the one I always use. And you don't have to install it, you don't have to do anything else. Just go to the website, paste in your code and export it. Yes. - Is there though like an API for that kind of a thing, like sometimes we don't know what the image is, somebody's just uploading it or something and we still have to use it and --- - So, like something you could have like a build process or something. - Yeah. - Yeah, if you, so, there's SVGO, which was what this was based off. So I think in the back end he's using SVGO to do that. I'll look after this to make sure that that's right. All right, SVG sprites. The next thing we're going to talk about are sprites. It's another way of animating that's a really kind of cool way of doing it. So, a sprite is one image that has many different images in it. And what you're supposed to do with a sprite is really just change what you see so that you see different stuff. So in this case, we have a sprite that is 382 points wide, 674 points high, and you can see it is eyes, showing eyes in different states. And the viewBox, the viewBox in this case is from 0, 0 in the corner to 382, 674 in the other corner because you can view the whole thing. So what if we change the viewBox to 0, 0, 382 across, but 160 down? Now we can only see the top set of eyes. What if we changed it to 0, 160? So we're starting at the 160 point down. We're still going across and we're still going down. So now I'm seeing the eyes are closed. Same thing with the next one. I go down another one and it's the worried, kind of, oh no eyes. And then the bottom one are angry eyes. So in that case, let's see how we can use this. All right, don't need you anymore. Oh, shoot. All right, so here's another demo. And you can see this one when she blinks. When she blinks, that is the sprite, that is the viewBox quickly going boink, boink. That's all it's doing. And I have her blinking once every 5 seconds, and then blinking twice the next 5 seconds. Now, this is one of those subscribe, no subscribes, so she'll follow my mouse a little bit when I get down there. And when I start moving toward subscribe she gets happy. She smiles a little bit. And if I hit Subscribe, she's so thankful, blinks twice. But if I start going over to No Subscribe she gets sad. And when I hit No Subscribe, she just gets angry. That's right. She didn't like that very much. And I don't know, my wife and I had this, not argument, but we'll call it that, No Subscribe, I don't know what else to call it. She's like, it's unsubscribe. But it's like she hasn't subscribed yet, so how can you unsubscribe? So, and then I'm not changing my slide, so. So No Subscribe it is. All right, so in this case, the important parts to see here, here again is the SVG and here you can see we have the blinking, in which case I'm calling closeEyes, and you can see bear.eyeContainerSvg .setAttribute .viewBox. So I'm actually just setting the attribute of the viewBox, changing the viewBox. Now, I don't have any real easing going on here because when eyes blink they just blink. They don't like, not necessarily need to have some kind of weird easing. So, sprites are really good when you have an animation that you don't need to actually see it animate from one to the other. So you want to set paths, you want to change things and animate, different things path-wise when you're actually wanting to see it go from one state to another. Here, I don't need to see that. And now also you see it on here when I have closeEyes, I'm just changing it to the same thing, the viewBox. I'm changing it to that 160 position. So I'm just moving the viewBox down. Now sadEyes, I have a showEyes function here that just sets the attribute of the viewBox to whatever I was last at. So, here I'm going to set the eye position, 340. And then I'm saying show the eyes. So I have a variable called eyePosX and whatever eyePosX is, that's what it'll go to. So I can go to setSadEyes, setAngryEyes, setDefaultEyes. And then down here I just have a mess of listeners, I'm mouse listening. When I move to one spot, move to another spot, call these different functions. So again, all I'm doing here is setting that attribute, changing it, and that's it, pretty simple. - Can you show how you had the SVG at the top though with the different demeanors? - Yes. Sorry, say that again. - So, you have your eyes, your SVG eyes. Sorry, I'm new to SVG. But can you layer an SVG inside of an SVG? Is that how you did that? - Yeah, good question. So, the question was is did I layer an SVG inside of an SVG? And yes, thank you. So, up on top here with the actual, you see here I have there's a bear-container, there's an eyes-container, and there's a muzzle-container, and each one has its own separate SVG element. So in this case, I'm not using one SVG element with different elements inside of it. I'm actually using three completely separate SVGs here with their own viewports to change them around, or viewBoxes, to change them around. And then through just CSS up here I am, where did I have it? Oh yeah, so eye-container. I'm just updating the top and left to position them in the center. - I got a question. - Yeah. - When you put your cursor in there and pupils move and follow your cursor, it's just changing the pupil position of the top sprite, right? - Correct. Yeah, so good question. So the question was, when I'm moving my cursor around, I'm still keeping the position of the top sprite. That's correct. So I have, and in this case it's not actually following my mouse, it's a delay, so I have a mouseover area around the subscribe thing. When I hover over that area I'm saying put the eyes over to this coordinate. And when you look in the center, put your eyes over here, and you'll notice it goes quickly over there, I don't animate that one. So this one, when I look to the sad eyes, it actually shifts the viewBox now to be the sad eyes. But looking everywhere else, it is the regular eyes. I'm moving the pupils around a little bit. And yeah, you can see here. So, I'm looking at the event and I'm basically taking percentages of where the mouse is. If the mouse is under 40%, look to the right, and look to the right is just moving those pupils, setting the attribute of the pupils, X and Y, to a different location. All right. Any other questions on this? This was a fun one. This was one of those that I quickly realized I spent way too much time making, but it was a lot of fun. All right. And I lost my space again. Let's get to here. All right, 136, all right, good. All right, accessibility. Now, accessibility is really an important thing with SVG because your SVG is a huge part of your page, especially if your text is there, you have text that you can search from. You want it to be accessible just like a regular image. You don't want, just like leaving an alt tag empty, you don't want to leave this empty. You want this to be known what it is. So, the first thing when it comes to accessibility in SVG, you want to give it a title and a description. The title and description are great for screen readers, they're great for just hovering over. The title is comparable to the alt tag of an image. So you want the title to be what your normal alt tag would be. And yes, so if I hover over it now, we get the little pop up with the little what is the alt, just like an image with alt text. Now with screen readers, you do need to add the aria-labelledby for the screen reader to catch it and pick it up. In this case though you can just reference the title and description. So, arialabelledby = robot-title robot-desc, which are the IDs of my title and description. So now the screen reader will pick those up and give the right information. And you also want to give it a role. Roles are kind of something that images usually have. Image tags are automatically picked up as images, so you don't see the role used that much. But with an SVG, an SVG can do a lot a different things. So in this case, you want to show what the role is. The default for a role is nothing, so you want to give it something. If it is just simply for decoration, purely visual, it's an image. If you want to have it as an informational, so there's something in there that's informational, descriptive about your product, whatever, then you can give it document role. And if it's got inputs inside of it and actually is meant for interactivity, then you can have the application role. And if you don't want anything to see it, this is just purely for decoration, you want screen readers to skip over it, you can have aria-hidden = true. So this way the screen reader completely skips it, which is really important if you have text in there that you don't really think is important. If you have text in your SVG that you really don't want a screen reader to hit, you want it to skip over, that's where aria-hidden = true. So in this case you see I do have a text element in there, that would get skipped. All right, any questions on the accessibility? All right. So, some animation libraries. We've done a lot with just pure JavaScript and CSS, which is awesome. But the part with JavaScript and CSS is it's in multiple locations. You have to have CSS for your transitions, you have the JavaScript where you're setting attributes, and sometimes that doesn't go well with full team. Sometimes you need that code to be a lot more readable, in one place so that everyone doesn't have to learn what you're doing. So the couple animation libraries we'll talk about, we'll talk about GreenSock. There's a lot of them out there. I know everyone says GreenSock. GreenSock has been around, it started out as an animation library for Flash. So, it's been around forever. It's really reliable, it's really performant. Performance is probably the key to it. It's as fast if not faster sometimes than just native JavaScript animations. We're also going to touch on mo.js, which is kind of a latecomer, but it's really a cool one for doing kind of particle like effects. And then I have anime.js up here. Anime.js is not a newer one, but it just recently had a complete remake, and it's really cool. The website for anime.js is awesome. I didn't know it enough to actually put a demo in here or have anything on it, but I put it up here so that you guys can check it out because it's a really fun one, it looked really cool to work with. So we'll start with GreenSock. So GreenSock animation, we'll start out with this, we've got the robot head here. So the robot head, if I were to move the robot head from one side of the screen to the other with just CSS, I'd have my transition, I'd grab my face element, and I'd say set the attribute, transform this many pixels. That's how I would do it with JavaScript and CSS. But if we were doing it with GreenSock, we have nothing under style. We don't need to do anything under the style. Everything is in the script. So GreenSock has a library called TweenLite and TweenMax. TweenMax has like everything. TweenLite has enough to do what you mostly want to do. It really depends on what size package you want to bring with you. It's a library, so it can get pretty big. So here we're going to say TweenLite.to, and I grab the face element. I'm going to say I want it to last 2 seconds. So the face element is going to animate for 2 seconds, x is going to go 500. Now notice I don't have to have transform. So transform, everything under transform and translate is already figured out here. It already says I'm guessing you're going to be using translate. That's probably correct. So everything that you're using here is just the translation stuff. We're going to ease it. And I'll go a little bit more into the easing. GreenSock has a huge library of easing. JavaScript by itself has some easing, ease out, linear, it doesn't compare to what GreenSock can do. Their easing library is massive. You can do pretty much anything and make things look a lot more real. And you can do an onComplete. So when this animation's complete, I can call a function, which is pretty cool. But notice it's really readable. So on the CSS side, that robot probably has a starting position of X of 0, but you can see what's happening here. It's really easy to read. It's a one liner, but the head got in the way so I made it into four. Now if I want to have him rotate, I add rotation, 360. Right, isn't that cool? Again, the same stuff, easing and just adding a rotation. Anything that you can do with regular CSS translation, you can do with this. Now what if I wanted to have him do a couple things in sequence? This is where these third-party libraries really come into play. Now if I were to do a sequence like that where it moved from one spot to another with just JavaScript, that would get kind of ugly. It would get ugly, we'd have to have some set time outs in there, it wouldn't be fun. In this case though, TweenLite to, face, 2 seconds, we're going X and Y in the corner, and now we're TweenLite.to, face, 2 seconds, X and Y, and we're coming down, and we're going to delay it 2 seconds. So this second line here doesn't start until 2 seconds later, which is exactly as long as the first one took. So we're moving from one to the other. A lot more readable, really easy to do. So that's how you would basically do what you would normally do in JavaScript now with GreenSock. But, what if I wanted to delay the whole thing? What if I want the top one to delay 2 seconds? Now I've got to go through my whole hierarchy of this animation and bump everything out 2 more seconds; not fun. So, that's where TimelineLite comes in. GreenSock has another library called Timeline. Timeline is where you can now have a different animation sequence, one after another, and makes it super clean. So here you can see we have a timeline, making the timeline element, timeline to, face, 2 seconds, X and Y. But then also timeline to, face, 2 seconds a different X and Y. I don't have to have any delays in there. These happen one after another, automatically. When one ends, the next one picks up. Pretty cool stuff. If I wanted to add a delay to the whole thing, I just add a delay to the first one. That bumps the whole animation out now. Or if I wanted to, I could move the delay to the actual timeline itself. When I make that timeline, I can say you don't even start, this timeline doesn't even start for 2 seconds, and that kicks in the whole thing when it's ready. Now here's the actual visualizer. So, GreenSock and the URL up top here, and I think I have it open. So, here's the visualizer. You can click on them, change the different easing, you can go down and change where Y ends up, you can change what ease it is, ease in, ease out. There is just an insane amount of elastic, slow motion, it's nuts what you can do. And you can just sit here playing with this for a while trying to figure out what kind of easing method you want. So that's GreenSock's Ease Visualizer as a site. And it'll even show you the code right there. So after you choose it, you just copy it and paste it in your code. I just looked at my watch, 1:45, all right. All right, so a demo of this one. Let's get through these guys, there we go. All right. So here's one where we're using the robot head. So this is a spinning lottery game. So we're going to spin the lotto, it's going to count up to a certain amount, and yes, that's a good amount of money. We have this animation of a burst happening and stars showing and the face of who won, who you're logged in as, and then a Spin Again button. I'll do it one more time so you can see it. But it's a sequence of events that happen over time. Money counts up, kaboom, stars, spinning stuff, super cool. So this one, if you look on the code side, you can see under my textShuffle one we have a dollars timeline, a stars timeline, and the gift, which is this guy's face coming up timeline. And you can see I'm having a delay, half a second, before the dollar timeline starts, 3.5 seconds, and it's really, really readable. You can see exactly what's kind of going on here. So you can see I have those starting off. You can see I have the dollars timeline is first off, over a half, it's lasting .2 seconds and it's fading it in. And that you can see right when it first starts there's nothing and the dollars kind of fade in. And then after, and I'm delaying it 3 seconds, after a delay of 3 seconds the dollars are going down 150 pixels, and I'm using one of those cool elastic ease outs because you can see it kind of bounce. So you'll see the dollars nicely just kind of bounce out of the way. And then the star one starts. So if I want to tweak this, it actually took a little bit of time, another one I spent way too much time on, but if you see the stars come in and the dollars bounce, it took a little bit of tweaking to figure out the exact timing to get that to happen, but it's not that hard to do because I just have to adjust those top-level times. All right, and I'm also having the burst here which is the circular thing. And you see with the circle that's rotating behind the stars there, I'm doing a rotation of 360, repeating -1, which is just keep on going infinitely. Now I have to change the transform origin to the middle. If I didn't change the transform origin to the middle, it would be pivoting on its corner. That doesn't work very well. So, moving that to the center helps it rotate. And this one I don't want to have any ease on. Something that you want to spin and keep animating throughout the whole time, you just want to give it a linear so it's nice and smooth. All right. Now another cool one is you see the little particle effect at the beginning there where the stars kind of shoot out and that all happens. So that's using a library called mo.js. Mo.js is a really fun one to play with. So, here we have the first starburst. And actually I have a separate demo for this one to make it a little bit easier to show you. So, we'll do mo test. Or not, no test, ha. All right, so here's mo test. So, mo.js, all you've got to do is find an element. You can put an element anywhere on your page, you give it an element, and now you can start making, this one it does a ton of stuff. If you go to mo.js 's website, their GitHub page, this is where you can do the coolest intros with bouncing letters and stuff. But one of the cool ones I always like is their burst. So mo.js has this burst that lets you do this kind of firework effect. So in this case, we have this constant here that's called Burst, and I gave it a radius, so it's going to go from 0 to 200 width. It's going to have 15 children, they're going to be orange. It's going to last 2 seconds and they're going to go for an opacity of 1 to 0. So here I can actually just hit, say play. So when I say play right after it, it plays right away. And that's where you see in that first one right there just going ka-poof. But I'm going to get rid of that play there. And with mo.js, you can have a timeline. So here we'll have burst1 as a mo.js timeline. And I can have that play. And I have it in a timeout here, so it can just keep going over and over every 2 seconds. So now, that first starburst that I made is in a timeline. And it's playing it out. Now the second one I have here is light green, same kind a stuff. So I can just add burst2. Starburst2, that's it. Now when it plays out we get two of them, and that one, starburst2, has a longer duration, or actually has a, sorry, shorter duration. But it goes out 400 pixels instead of 2. So it goes out twice as far, twice as fast. And it gives it kind of a cool burst effect. Then we've got some cool little circles here. So, I made some circles. First I have a constant with a circle that has the same properties of everything. And then I'm using a spread operator to add more. So I have a circle and a circle 2 that's delayed by 500 ms. So I'll add those to it. So now we've got circ and circ2. And now when it shoots out, it's a cool little burst just like that. And you can just, I mean, this is just one you can just play with. You can just sit there and on Saturday night, staying at home. And it's fun to play with this. You go to their docs, there's different shapes you can have, different effects you can make, and you can really, you can go way overboard on it. But this is one where I stop myself before going too far in the demo with it. I did, I went way too far with the demo on this one and the wife said that that firework effect was way too crazy, so I mellowed it out. But you can see having it as a background of something else just gives it that cool effect. All right. All right, so those are some of the libraries that are available to you. Real quick before I go any further. No, I think I will. I was going to show you, and I think I already did. So Adobe XD, again, is one that I'm using for this presentation. There is design tools. And again, if you've never made SVG before and you want to just try making logos or stuff, I mean, it is so beyond simple. There is square, circle, triangle, line, and pen. Like, that's it. You have a very, very simple set a tools. But you can make some pretty cool stuff with it. On the right there is, so like I can show the bear here. Actually, I'll go to the robot wherever he is. So like the girl bear, you can group them. So in Adobe Illustrator and in Adobe XD, when you name something, so if I put a square on the grid and I name it square, then when I export it it will have an ID of square. And that's why when I showed you that optimization tool, do you want to maintain the IDs, you definitely want to maintain the IDs. When I group, do you see there's a group called bear, there's a group called eyes, shirt, face. Those groups are then sent with the IDs for the group. So even though they're shown as just folders here, that's kind of just so you don't have to worry about it. It's exported as a group containing those elements, which makes it really cool and easy to use. Now, the downside of using Adobe XD is Adobe XD, you saw how my animations went from page to page and they kind of shifted and animated around. So all those dimensions travel with the SVG elements. So they have these really weird transforms that occur when you export it, and that's why I suggest bring it into another program like Illustrator or something that you can just paste it and save it again, and that'll make it pure of all those weird transforms. Adobe XD is made for like mock ups and showing mock ups happen. It's not really made for this. But it's a really good tool to get used to and started using SVG. All right. All right, so to end it up, let me get back in there. Special thanks to, these are people that I follow constantly. So if you want to get into SVG and animation, Sarah Drasner, she's with Microsoft, now she's with Netlify. And you've seen the second she joined Netlify, their whole page blew up with just SVG animations all over the place. She's one of the top speakers. She has demos all over the place. I've learned almost everything I've learned from watching her and listening to her. Sara Soueidan also is a huge SVG enthusiast. She is big on accessibility. She has really great courses on just what the transformations mean. You learn the really good nuts and bolts from her. And also, Coursetro, Designcourse. It's a YouTube channel. He was the one that kind of got me learning how to do this with just Adobe XD and how simple it is and how much of an intro you can get into it. He's also on, there was another, what learning Website? Skillshare, Skillshare, he's on that as well doing SVG courses. All right. And again, my name's Ben Felda. On the top is a link to this whole animation. So that top link takes you to a web page where this is playing. So you can go through it and see it. Or on the, the presentation's the bottom, sorry. GitHub's on top. The GitHub has this entire repo that you've looked at. It also has the Adobe XD file for the presentation, so you can see some of the stuff that was in there. Again, all the stuff, the robot, the bears were all made with Adobe XD. So, you can kind of see how it's done. And that's all I've got. Any other questions? All right, thanks a lot guys, I appreciate it.
Created on: 11th September, 2019
Last updated: 12th October, 2022
Tagged With:

